
Deploying Wazuh in a Corporate Environment
- Sean Nanty (z3tssu)
- Nov 7, 2024
- 2 min read

Hello, as a Sys Admin, I have been looking for a free HIDS/XDR solution to implement in my organization.
The decision was to try out Wazuh, as it is a fairly popular tool and is open source. Below is a brief writeup, on some features of Wazuh.
Objectives
Install Wazuh Manager
Install Wazuh Agents
Detect Vulnerabilities
Centralized Agent Configuration
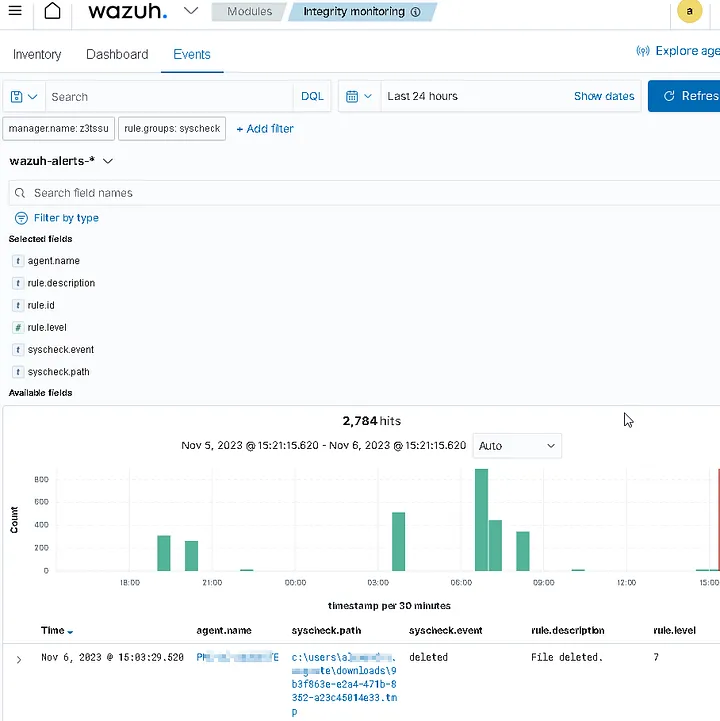
Enable File Integrity Monitoring
Installation of Components
Install Wazuh Manager on Ubuntu VM
Simple process, just go to: https://documentation.wazuh.com/current/quickstart.html
Run: curl -sO https://packages.wazuh.com/4.6/wazuh-install.sh && sudo bash ./wazuh-install.sh -a
You will be provided with a URL that directs you to the dashboard
2. Configure Wazuh Manager:
After installation, you can either configure it through the dashboard > Management > Configuration > Edit Configuration
OR Remotely through ssh and accessing the ossec.conf on the wazuh manager server.
Navigate to /var/ossec/etc/

edit the ossec.conf file (Make sure you are root) | nano ossec.conf
Configure as mine


Now you may notice my Windows configs may be a bit different than yours, this is because I added the <path> tags, which are pointing manually to the NVD and MSU database files that I need to manually download every day.
This is because of some connectivity issues, which I haven't resolved yet. Basically, I have a bash script that downloads the NVD and MSU database and stores it in a folder on the Wazuh-Manager Server, the <path> simply points to that directory.
After these, everything should be running smoothly, the Wazuh manager should be able to detect vulnerabilities in agents.
3. Deploy Agents
Now the fun/tricky part, how do I deploy agents to 50 endpoints? since we do not have the AD/DC on-premise but rather provided by an outsourced company, it becomes a bit of a hassle, since I could have deployed it through GPO easily.
The option for now would be manual installation
Luckily I have Psexec remoting capabilities on all endpoints, so I can configure, download, and install the agents remotely through Psexec
The agent file is stored on a shared NAS for ease of access.
3. Installing via Psexec
Remote access to an endpoint: psexec -is \\Host-Name cmd
Installing Wazuh agent: wazuh-agent-4.6.0–1.msi /q WAZUH_MANAGER=”Wazuh-manager-IP"
4. Configuration of Agents
Agents can be configured in two ways. Individually by accessing C:\Program Files (x86)\ossec-agent\ossec.conf
Now ensure the following are set to “no” and add <hotfixes> as seen in the below image

This is configured to allow the manager to update vulnerabilities detected on agents.

So the vulnerability detector is working now. What's next?
Centralized Agent Configuration
This is basically configuring all agents in a centralized manner, rather than manually configuring individual agents. The way this is done is through the shared, default agent.conf for the default group, located on the wazuh-manager server, or accessed from the Wazuh dashboard.
agent.conf on server
Go to:
/var/ossec/etc/shared/default/agent.confWazuh Dashboard group config (agent.conf)

edit agent.conf

Now what the heck do I put in there you are probably thinking.
Basically, put all the configurations that you want to affect all agents in the default agent group, as seen below:

Shared Agent Configuration
I have enabled the System Inventory for all Agents
I have added a directory for FIM, which will check for any items added, deleted, or modified in the Downloads folder of the Users directory.


Comments